When you click on links to various merchants on this site and make a purchase, this can result in this site earning a commission. Affiliate programs and affiliations include, but are not limited to, the eBay Partner Network.
Price: $45.99
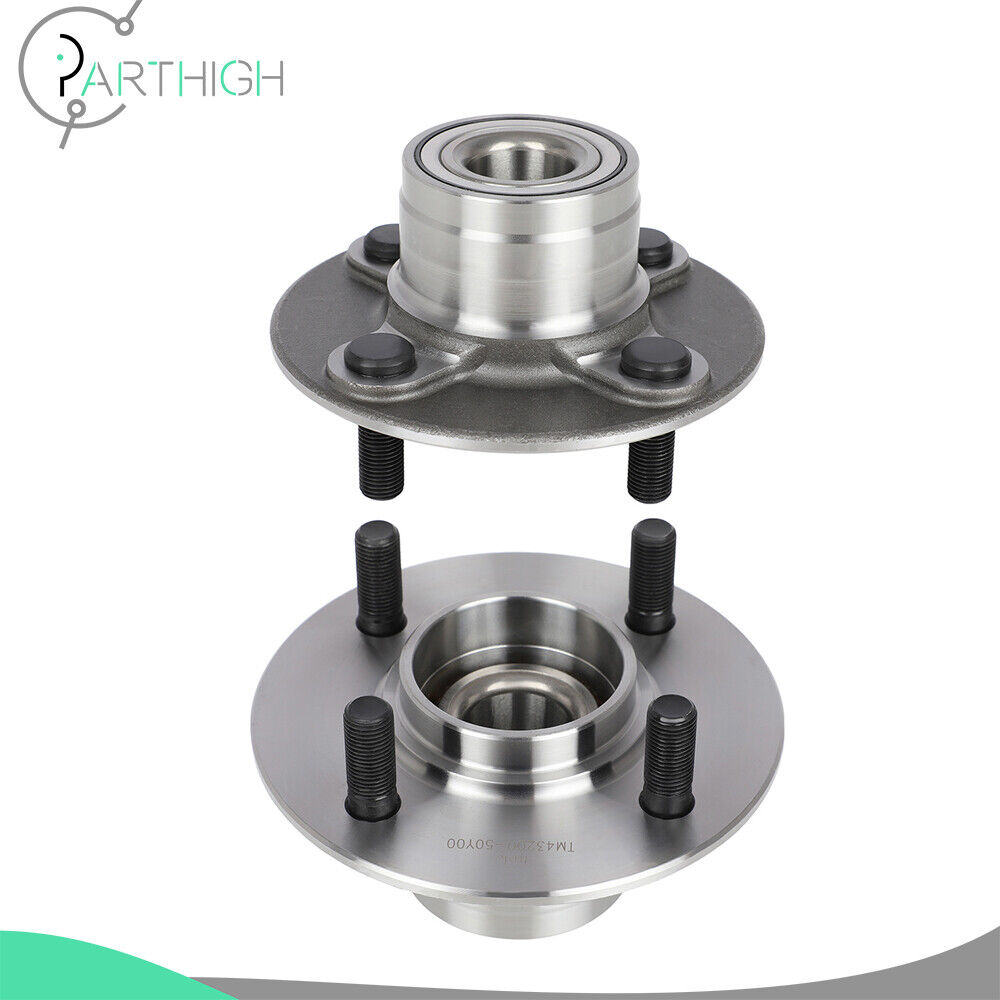
- Fits Nissan 200SX 1995-1998 (1997 1998 USA Built Models Only)
- Fits Nissan NX 1991-1993
- Fits Nissan Sentra 1991-1999
- Position: Rear
- Bolt Pattern: 4x3.94/ 4x100
- Wheel Stud Size: 12x1.5
- Wheel Lugs: 4-Bolt
- ABS Type: Non-ABS
- Drive Type: FWD
- Replaces dealer part numbers: 512025, 102105, 750-0067, 712025, 405.42004, 1411-45276, BR930134, 4320001M01, 432000M000, 432000M001, 432004B000, 432004B010, 4320050Y00, 4320050Y01, 4320050Y02, 4320050Y05, 4320050Y06, 4320050Y07, 4320050Y10, 432020M000, 432020M001, 432024B000, 432024B010, 4320250Y00, 4320250Y01, 4320250Y02, 4320250Y10
Application:
- Fits Nissan 200SX 1995-1998 (1997 1998 USA Built Models Only)
- Fits Nissan NX 1991-1993
- Fits Nissan Sentra 1991-1999
Description:
- Position: Rear
- Bolt Pattern: 4x3.94/ 4x100
- Wheel Stud Size: 12x1.5
- Wheel Lugs: 4-Bolt
- ABS Type: Non-ABS
- Drive Type: FWD
- Replaces dealer part numbers: 512025, 102105, 750-0067, 712025, 405.42004, 1411-45276, BR930134, 4320001M01, 432000M000, 432000M001, 432004B000, 432004B010, 4320050Y00, 4320050Y01, 4320050Y02, 4320050Y05, 4320050Y06, 4320050Y07, 4320050Y10, 432020M000, 432020M001, 432024B000, 432024B010, 4320250Y00, 4320250Y01, 4320250Y02, 4320250Y10
Installation:
Replacing a car wheel bearing typically involves several steps and requires some mechanical knowledge and tools. Here's a general overview of the process:
- Park your vehicle on a flat surface.
Before you begin, park your vehicle on a level surface. Put the vehicle in park (or, for manuals, 1st, reverse, or neutral) and be sure to put the parking brake up.
- Use wheel chocks to secure wheels whose bearings you aren't replacing.
For added stability, it can be smart to use sturdy chocks to hold your vehicle's wheels in place.
- Loosen the lug nuts and lift the wheel using a jack.
For proper access to the internal components of the wheel whose bearings you're replacing, you'll need to elevate the wheel. Before you lift the wheel, however, you may want to slightly loosen the lug nuts with a tire iron, as breaking their initial resistance is harder without the ground holding the wheel steady. After this, carefully lift your wheel.
To prevent dangerous slippage, make sure that the vehicle is securely seated on the jack and that the jack is flush with the ground before attempting to lift the wheel. It's also important to make sure the jack touches the vehicle on a sturdy, metal piece of the undercarriage, rather than on fragile plastic molding, as the weight of the vehicle can damage the latter.
Most vehicles have jack points where the frame has extra support to lift the vehicle. It's best to check the owners manual to learn the best place to position your jack.
- Unscrew the lug nuts and remove the wheel.
The lug nuts, which you should have already loosened, should come off easily. Remove these and put them in a safe place where you won't lose them. Next, remove the wheel itself.
- Remove the brake caliper.
Using a socket and a ratchet, remove the caliper's bolts. Then, remove the caliper itself using a screwdriver.
When removing the caliper, be careful not to let it dangle freely, as this can damage the brake hose. Instead, hook it on a secure part of the undercarriage or use a short length of string to tie it in place. A bungee cord or a bent wire hanger are two additional ways to secure the caliper.
- Remove the dust cover, cotter pin, and castle nut.
In the center of the vehicle's exposed rotor should be a small metal or plastic cap called the dust cover which protects the components holding the rotor in place. Since you'll need to remove the rotor, the cap and the components it protects will have to go. Usually, the dust cover can be removed by gripping it with calipers and tapping the calipers with a hammer. Inside, you'll find the castle nut, usually secured with a cotter pin. Remove the cotter pin with pliers or wire cutters, then unscrew the castle nut and remove it (and its washer).
- Remove the rotor.
Place your thumb securely on the peg in the middle of the rotor assembly. Firmly (but somewhat gently) bump the rotor itself with the palm of your other hand. The wheel's outer bearing should loosen or fall out. Remove the outer bearing. Finally, remove the rotor itself.
- Unscrew the hub bolts and remove the old hub.
The wheel bearing is inside the hub, which is usually held in place with several bolts that screw in from behind. These bolts can be tricky to reach because they're tucked away in the undercarriage, so you may want to use a skinny socket wrench and/or a breaker bar to loosen and remove them. When you've removed the bolts, take the hub off of the axle.
Note that if you've purchased a new hub assembly, at this point, you can install the new hub and put the wheel back together and you'll be finished. To install a new set of bearings inside the hub, read on.
- Disassemble the hub assembly.
To gain access to the bearings, you'll need to take apart the hub. You'll probably need to use a wrench (and/or a hammer) to remove the end of the hub and any anti-lock brake wheel that may be part of your hub. Then, you may need to use a specialized "puller" tool to remove the central bolt. The bearing assembly should come apart easily.
- Remove races and clean the knuckle.
Removing the bearing assembly's races usually means physically breaking them with a grinder or hammer and chisel. Because of this, you'll want to have replacement races ready. After removing the races, it's a good idea to clean the inside of the bearing assembly around the knuckle.
- Install new races and new wheel bearings.
Set new races in place in the bearing assembly with a few taps from a hammer. Finally, grease a new inner bearing and install it in the assembly. Ensure the bearings are properly aligned, that they're pushed in as far as they can go, and that any sealing rings are flush with the outside of the assembly.
Use lots of grease for your bearings. You can apply the grease by hand or with a special "bearing packer" tool. Rub plenty of extra grease around the outsides of your bearings and any sealing rings.
- Replace all parts in reverse order.
Put the hub assembly back together and install it on the axle shaft. Put the rotor back on and secure it in place with its bolts. Install a new, well-greased outer bearing at this point. Lightly tighten the castle nut and secure it in place with a new cotter pin. Replace the dust cap. Put the caliper and brake pads back in place and secure them with the appropriate bolts. Finally, put the tire back in place and secure it with lug nuts.
Item SpecificsBrand PARTHIGHManufacturer Part Number PART802863HIGHABS Sensor Non-ABSPlacement on Vehicle RearMaterial SteelFinish Polished, Rust ProtectedType Wheel Hub & Bearing AssemblyOE/OEM Part Number 512025Quantity 2Fitment 1 For Nissan 200SX 1995 1996 (1997 1998 USA Built Models Only)Fitment 2 For Nissan Sentra 1991 1992 1993 1994 1995 1996 1997 1998 1999Fitment 3 For Nissan NX 1991 1992 1993Interchange Part Number 1411-45276, BR930134, 4320001M01, 432000M000, 432000M001Anti-lock Braking System NoBolt Pattern 4 x 3.94 in (4 x 100 mm)Driven Or Non-Driven Type Hub Assembly Non-DrivenBolt Circle Diameter 3.94 in. / 100 mmBrake Pilot Diameter 2.68 in. / 68 mmFlange Diameter 5.28 in. / 134 mmFlange Offset 2.07 in. / 52.5 mmHub Pilot Diameter 2.45 in. / 62.3 mmWheel Pilot Diameter 2.32 in. / 59 mmWheel Stud Quantity 4Wheel Stud Size M12x1.5Wheel Studs Included YesDrive Type FWD
Warning
WARNING: Cancer and Reproductive Harm - www.P65Warnings.ca.gov.
(California Customers should pay more attention about it.)
PaymentPayPal Only.
Only PayPal accept in this selection.
Shipping99% of orders shipped within 24 hours.
2-8 days in transit.
Nice and strongpacking.
UPS, USPS,fedExcomes to be ourfirst choice.
ReturnThis item is backed by our 1-year warranty.
Refund will be given as money back or replacement
Item must be returned in original pacakge and packing the same as received.
Seller isresponsible for the return if delivered item not the same as described orreceived damaged.
Note:
Buyers are responsible for the return shipping cost if the problem ids caused by buyer.
We only warranty cost of parts, any installation or other fees are non-refundable.
About UsIf you have a question about the itemyou should contact us before bidding.
Any problem fund, do contact us please, any question or problem will be replied within 24 hours (except the weekend and holiday).
Our Customer Service Team is always online to answer.
Shop CategoryStore Home Mirrors Oxygen Sensors Mass Air Flow Sensors Cooling System◈Radiators◈Cooling Fans◈Fan Clutchs◈Intercoolers◈AC Condenser◈Radiator Support Roof Racks Tonneau Covers Window Visors LED Headlight Assembly Fuse Holder Box Windshield Outer Trim Pillar Posts Air Conditioning System◈Heater Cores◈Blower Motor◈Evaporators Running Board Motor Rear View Camera Center Console Window Scoop Louver Cover winch Door Handle Ignition Coils Light◈3rd Brake Light◈Cab/Side Marker◈Instrument Panel Light Window Regulator Brake Calipers & Bracket Strut Mount Cylinder Piston Kit Complete Struts CV Axle Engine Dipstick Ballast Module Throttle Body Shock Struts Air suspension Transfer Case Shift Motor Ignition Coils & Spark Plugs Turbocharger Bumper Window switch Suspension Kits Car CV Axle Wheel Spacers Wheel Hub Bearing Coilovers Shock Strut & Suspension Kit OtherHot Item 4x Roof Rack Cover Rail End Shell Cap Replacement For Toyota Highlander 2008-13 USD 21.44 For 8500-13000LBS Winch Electric Waterproof Soft Winch Cover Dust Cover USD 15.39 For 1999-2006 Chevrolet Silverado 1500 Left+Right Side View Door Mirrors Manual USD 40.95 A/C Blower Motor Resistor For 1999 00 01-2002 Chevrolet Silverado 1500 2500 Kit USD 42.99 Tow Mirrors Pair For 2004-14 Ford F-150 Power Heated Puddle Signal -Wholesale USD 90.75 New List Item For Toyota 4Runner SR5 Limited 2003-2021 1X Rear Left Side Wheel Bearing Module USD 37.99 For Toyota 4Runner SR5 Limited Trail 2003-2021 2X Rear Wheel Bearing Modules USD 54.99 For Toyota 4Runner SR5 Limited 2003-2021 1X Rear Right Side Wheel Bearing Module USD 37.99 FWD For Toyota Sienna CE LE XLE Limited 1998-2002 2003 1X Rear Wheel Hub Bearing USD 51.99 FWD For Toyota Sienna CE LE XLE Limited 1998-2003 2X Rear Wheel Hub Bearings USD 84.99 Excellent DeliveryHelp & InfoPayment PolicyShipping PolicyReturn PolicyFAQAbout Us FWD For Nissan Sentra GSX GSE SE Base GLE 1991-1999 2X Rear Wheel Hub BearingsApplication:
- Fits Nissan 200SX 1995-1998 (1997 1998 USA Built Models Only)
- Fits Nissan NX 1991-1993
- Fits Nissan Sentra 1991-1999
Description:
- Position: Rear
- Bolt Pattern: 4x3.94/ 4x100
- Wheel Stud Size: 12x1.5
- Wheel Lugs: 4-Bolt
- ABS Type: Non-ABS
- Drive Type: FWD
- Replaces dealer part numbers: 512025, 102105, 750-0067, 712025, 405.42004, 1411-45276, BR930134, 4320001M01, 432000M000, 432000M001, 432004B000, 432004B010, 4320050Y00, 4320050Y01, 4320050Y02, 4320050Y05, 4320050Y06, 4320050Y07, 4320050Y10, 432020M000, 432020M001, 432024B000, 432024B010, 4320250Y00, 4320250Y01, 4320250Y02, 4320250Y10
Installation:
Replacing a car wheel bearing typically involves several steps and requires some mechanical knowledge and tools. Here's a general overview of the process:
- Park your vehicle on a flat surface.
Before you begin, park your vehicle on a level surface. Put the vehicle in park (or, for manuals, 1st, reverse, or neutral) and be sure to put the parking brake up.
- Use wheel chocks to secure wheels whose bearings you aren't replacing.
For added stability, it can be smart to use sturdy chocks to hold your vehicle's wheels in place.
- Loosen the lug nuts and lift the wheel using a jack.
For proper access to the internal components of the wheel whose bearings you're replacing, you'll need to elevate the wheel. Before you lift the wheel, however, you may want to slightly loosen the lug nuts with a tire iron, as breaking their initial resistance is harder without the ground holding the wheel steady. After this, carefully lift your wheel.
To prevent dangerous slippage, make sure that the vehicle is securely seated on the jack and that the jack is flush with the ground before attempting to lift the wheel. It's also important to make sure the jack touches the vehicle on a sturdy, metal piece of the undercarriage, rather than on fragile plastic molding, as the weight of the vehicle can damage the latter.
Most vehicles have jack points where the frame has extra support to lift the vehicle. It's best to check the owners manual to learn the best place to position your jack.
- Unscrew the lug nuts and remove the wheel.
The lug nuts, which you should have already loosened, should come off easily. Remove these and put them in a safe place where you won't lose them. Next, remove the wheel itself.
- Remove the brake caliper.
Using a socket and a ratchet, remove the caliper's bolts. Then, remove the caliper itself using a screwdriver.
When removing the caliper, be careful not to let it dangle freely, as this can damage the brake hose. Instead, hook it on a secure part of the undercarriage or use a short length of string to tie it in place. A bungee cord or a bent wire hanger are two additional ways to secure the caliper.
- Remove the dust cover, cotter pin, and castle nut.
In the center of the vehicle's exposed rotor should be a small metal or plastic cap called the dust cover which protects the components holding the rotor in place. Since you'll need to remove the rotor, the cap and the components it protects will have to go. Usually, the dust cover can be removed by gripping it with calipers and tapping the calipers with a hammer. Inside, you'll find the castle nut, usually secured with a cotter pin. Remove the cotter pin with pliers or wire cutters, then unscrew the castle nut and remove it (and its washer).
- Remove the rotor.
Place your thumb securely on the peg in the middle of the rotor assembly. Firmly (but somewhat gently) bump the rotor itself with the palm of your other hand. The wheel's outer bearing should loosen or fall out. Remove the outer bearing. Finally, remove the rotor itself.
- Unscrew the hub bolts and remove the old hub.
The wheel bearing is inside the hub, which is usually held in place with several bolts that screw in from behind. These bolts can be tricky to reach because they're tucked away in the undercarriage, so you may want to use a skinny socket wrench and/or a breaker bar to loosen and remove them. When you've removed the bolts, take the hub off of the axle.
Note that if you've purchased a new hub assembly, at this point, you can install the new hub and put the wheel back together and you'll be finished. To install a new set of bearings inside the hub, read on.
- Disassemble the hub assembly.
To gain access to the bearings, you'll need to take apart the hub. You'll probably need to use a wrench (and/or a hammer) to remove the end of the hub and any anti-lock brake wheel that may be part of your hub. Then, you may need to use a specialized "puller" tool to remove the central bolt. The bearing assembly should come apart easily.
- Remove races and clean the knuckle.
Removing the bearing assembly's races usually means physically breaking them with a grinder or hammer and chisel. Because of this, you'll want to have replacement races ready. After removing the races, it's a good idea to clean the inside of the bearing assembly around the knuckle.
- Install new races and new wheel bearings.
Set new races in place in the bearing assembly with a few taps from a hammer. Finally, grease a new inner bearing and install it in the assembly. Ensure the bearings are properly aligned, that they're pushed in as far as they can go, and that any sealing rings are flush with the outside of the assembly.
Use lots of grease for your bearings. You can apply the grease by hand or with a special "bearing packer" tool. Rub plenty of extra grease around the outsides of your bearings and any sealing rings.
- Replace all parts in reverse order.
Put the hub assembly back together and install it on the axle shaft. Put the rotor back on and secure it in place with its bolts. Install a new, well-greased outer bearing at this point. Lightly tighten the castle nut and secure it in place with a new cotter pin. Replace the dust cap. Put the caliper and brake pads back in place and secure them with the appropriate bolts. Finally, put the tire back in place and secure it with lug nuts.
Item SpecificsBrand PARTHIGHManufacturer Part Number PART802863HIGHABS Sensor Non-ABSPlacement on Vehicle RearMaterial SteelFinish Polished, Rust ProtectedType Wheel Hub & Bearing AssemblyOE/OEM Part Number 512025Quantity 2Fitment 1 For Nissan 200SX 1995 1996 (1997 1998 USA Built Models Only)Fitment 2 For Nissan Sentra 1991 1992 1993 1994 1995 1996 1997 1998 1999Fitment 3 For Nissan NX 1991 1992 1993Interchange Part Number 1411-45276, BR930134, 4320001M01, 432000M000, 432000M001Anti-lock Braking System NoBolt Pattern 4 x 3.94 in (4 x 100 mm)Driven Or Non-Driven Type Hub Assembly Non-DrivenBolt Circle Diameter 3.94 in. / 100 mmBrake Pilot Diameter 2.68 in. / 68 mmFlange Diameter 5.28 in. / 134 mmFlange Offset 2.07 in. / 52.5 mmHub Pilot Diameter 2.45 in. / 62.3 mmWheel Pilot Diameter 2.32 in. / 59 mmWheel Stud Quantity 4Wheel Stud Size M12x1.5Wheel Studs Included YesDrive Type FWDWarning
WARNING: Cancer and Reproductive Harm - www.P65Warnings.ca.gov.
(California Customers should pay more attention about it.)
PaymentPayPal Only.
Only PayPal accept in this selection.
Shipping99% of orders shipped within 24 hours.
2-8 days in transit.
Nice and strongpacking.
UPS, USPS,fedExcomes to be ourfirst choice.
ReturnThis item is backed by our 1-year warranty.
Refund will be given as money back or replacement
Item must be returned in original pacakge and packing the same as received.
Seller isresponsible for the return if delivered item not the same as described orreceived damaged.
Note:
Buyers are responsible for the return shipping cost if the problem ids caused by buyer.
We only warranty cost of parts, any installation or other fees are non-refundable.
About UsIf you have a question about the itemyou should contact us before bidding.
Any problem fund, do contact us please, any question or problem will be replied within 24 hours (except the weekend and holiday).
Our Customer Service Team is always online to answer.
All rights reserved.